Revival Kit – Quickstart Guide

Initial Setup
Supported Platforms

Computers
- Windows
- Mac
- Linux (Includes Steam OS)
PlayStation
- PlayStation 2
- PlayStation 3
- PlayStation 4
- PlayStation 5

Xbox
- Xbox 360
- Xbox One
- Xbox Series

Nintendo
- Wii
- Switch
- Switch 2 [WIP]
Supported Guitar Controller Bodies

RedOctane Wii Les Paul
(GH3, Aerosmith)

RedOctane Wii Sunburst
(World Tour)

RedOctane Wii “GH5”
(GH5, Band Hero)

RedOctane XB360/PS3 Les Paul
(GH3, Aerosmith)

RedOctane XB360/PS3 Sunburst
(World Tour)

RedOctane XB360/PS3 “GH5”
(GH5, Band Hero)

RedOctane PS2 SG
(GH1, GH2)

RedOctane PS2 Kramer
(GH3)

RedOctane XB360 Xplorer
(GH2, GH3)
Supported Games
- PlayStation 2 REQUIRES RB GUITAR PRESET
- Guitar Hero games, World Tour and later
- Rock Band games are not fully tested
- PlayStation 3
- All Guitar Hero games
- All Rock Band games
- DJ Hero 1 & 2
- PlayStation 4 & PlayStation 5
- Rock Band 4
- Fortnite Festival
- Xbox 360
- All Guitar Hero games
- All Rock Band games
- DJ Hero 1 & 2
- Xbox One & Xbox Series S/X
- Rock Band 4 (Authentication required)
- Fortnite Festival
- Wii (REQUIRES RB GUITAR PRESET)
- Rock Band 2
- Rock Band 3
- Rock Band Beatles
- Rock Band Green Day
- Nintendo Switch / 2
- Fortnite Festival
Programming and Updating
Requirements
- Revival Kit Zeroboard (USB port on PCB or daughterboard)
- A computer that uses Windows, macOS, or Linux
- The latest revision of RCM Programming Tool
Click here for a step-by-step programming guide.
To change the preset of your Revival Kit Zeroboard, you must use the RCM Programming Tool. Click here to be taken to the download page.
- Open the RCM Programming Tool.
- Plug your Revival Kit Zeroboard into your computer either using the USB-C port on the PCB or the port on the daughterboard. You will see it appear with “Configure” and “Reset to factory” buttons.
- Click “Configure“
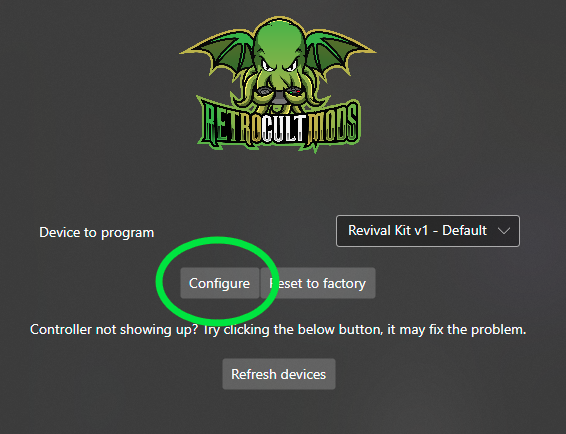
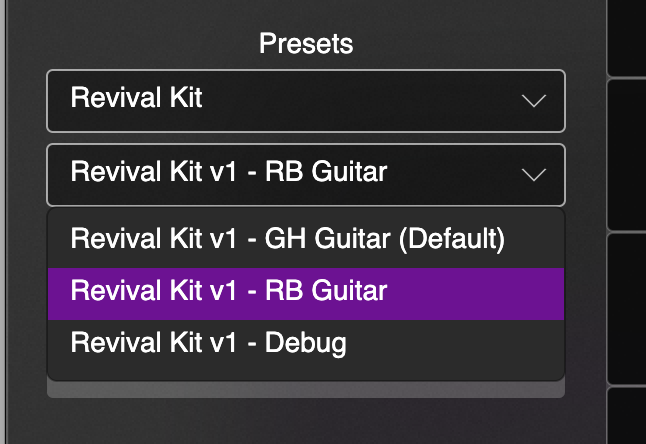
- You will be taken the configuration page where, on the left side, there is a dropdown for you to change presets.
When switching to a different preset, click it, then click “Save Settings”.
- You will want to wait until the bar at the bottom reaches 100% and says Status: Done.

Final notes:
You will need to calibrate the Whammy and Tilt when you fully set up the guitar. See the following section for more details.
Instrument Setup and Tuning
All Revival Kit need calibration of the tilt and whammy.
Tilt Tuning
Click here for a step-by-step Tilt Tuning guide.
- Scroll down to the Tilt section and click the dropdown. You’ll see this:

- Click Calibrate!
- Then, hold your guitar in the position would play it normally. Click Next while the guitar is in that position.
- Now, adjust to the height where you would the tilt to activate. Click Next while holding the guitar in that position.
- You’re done! Click Save Settings on the left side. After it’s done, give it a try!
Find the sweet spot for your style of play!
Whammy Tuning
Whammy motion will not work properly until it is calibrated.
Click here for a step-by-step Whammy Tuning guide.
- Scroll down to the Whammy section and click the dropdown. You’ll see this:

- Click Calibrate!
- Then, don’t touch your whammy bar and then click Next.
- After that, push your whammy bar down as far as it can go without overdoing it. Hold it there, then click Next.
- Now you have to set Deadzone. Push the whammy bar in a little bit and you can see the value go up a little bit. Look for a point where the whammy won’t activate on it’s own. Hold it there, then click Next.
- You’re done! Click Save Settings on the left side. After it’s done, give it a try! You can manually adjust the deadzone with the sliders as well if you’d like to tweak your settings.

Find the sweet spot for your style of play!
Enabling Analog Stick (Wii guitars only)
This is disabled by default.
Click here for a step-by-step Wii Guitar Analog Stick Enabling guide
By default, we disable the analog stick function on the Revival PCB. If there is no analog stick attached to the Revival Kit Zeroboard/Strumboard, it causes issues if enabled.
- Connect the analog stick board to the Revival Kit Zeroboard
- Connect the Revival Kit Zeroboard to your computer and open the RCM Programming Tool
- Click Configure
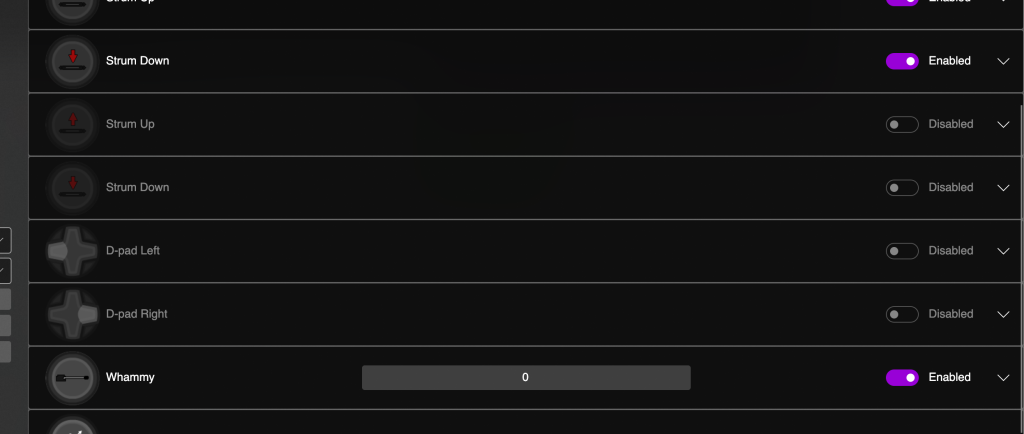
- Scroll down to the four disabled inputs. These are the inputs for the analog stick.
- Enable them, then click Save Settings on the left side of the window.
- The analog stick should now work!
Troubleshooting
My Revival Kit is not appearing in the RCM Programming Tool
Possible Issues and Remedies:
- The guitar is booting into a different mode (computer still makes sound when guitar is plugged in)
- Make sure no buttons are pressed or held down upon plugging in the guitar
- Open the guitar back up and disconnect the fretboard and start/select board, then reconnect the guitar to your computer
- Malfunctioning USB cable
- Try a different cable! Sometimes using a different one and then switching back to the first one just ‘wakes up’ the board
- Malfunctioning USB port
- Use a different port! Like the possible issue with the USB cable, sometimes the computer just needs to read the device from a different port
If all else fails:
FLASH NUKE METHOD
- Hold down the BOOT button on your Revival Kit PCB while plugging it in directly to your PC
- This should bring up a removable drive named “RPI-RP2”; copy and paste the following file into that drive:
Flash Nuke File (Click on me!)- After the file is transferred, the drive will disappear. Wait for the drive to reappear and then try programming it with the tool again.
My frets are not functioning properly/RGB not functioning properly
Possible Issues and Remedies:
- During installation, the wires may have been pinched or been pierced by the screws
- Open the guitar up and inspect the wires closely
- Reseating the cables can sometimes help
- We include one extra JST cable for the neck connections. If one of them fails, try that one instead
- The wires may be installed into the incorrect spots
- FRET1 and FRET2 have very different connections on them, as one of them has the GROUND connection. It is best to install them one cable at a time
- Although RGB uses the same cable, make sure that it goes to the RGB ports on both the fretboard and strumboard
- The Revival Kit PCB may be programmed to the incorrect device variant
- You will want to factory reset the device, either via the RCM Programming Tool or by FLASH NUKING.
- To factory reset, plug the Revival Kit PCB, open the RCM Programming Tool, then click Reset to Factory. After, the Revival Kit PCB will reconnect to the computer and you will be presented a screen where you can pick device variant and device preset. Make sure that the device variant is REVIVAL KIT.
- FLASH NUKE METHOD:
- You will want to factory reset the device, either via the RCM Programming Tool or by FLASH NUKING.
- Hold down the BOOT button on your Revival Kit PCB while plugging it in directly to your PC
- This should bring up a removable drive named “RPI-RP2”; copy and paste the following file into that drive:
Flash Nuke File (Click on me!)- After the file is transferred, the drive will disappear. Wait for the drive to reappear and then try programming it with the tool again.