ACE Adapter – Quickstart Guide
Initial Setup
Supported Platforms

Computers
- Windows
- Mac
- Linux (Includes Steam OS)
PlayStation
- PlayStation 2
- PlayStation 3
- PlayStation 4
- PlayStation 5

Xbox
- Xbox 360
- Xbox One
- Xbox Series

Nintendo
- Wii
Supported Games
- PlayStation 2
- Guitar Hero games, World Tour and later
- Rock Band games are not fully tested
- PlayStation 3
- All applicable Guitar Hero games
- All applicable Rock Band games
- PlayStation 4 & PlayStation 5
- Rock Band 4
- Xbox 360
- All applicable Guitar Hero games
- All applicable Rock Band games
- Xbox One & Xbox Series S/X
- Rock Band 4 (Authentication required)
- Wii
- Guitar Hero games, World Tour and later
- Rock Band 2
- Rock Band 3
- Rock Band Beatles
- Rock Band Green Day
Note: Keys are ONLY for Rock Band 3 and YARG. No other games support it.
Unsupported Games
- Wii / Dolphin
- Rock Band 1
- Rock Band Track Pack 1
- Rock Band Track Pack 2
Programming
Requirements
- ACE Adapter
- A computer that uses Windows, macOS, or Linux
- The latest revision of RCM Programming Tool
- A compatible controller or electronic drum kit
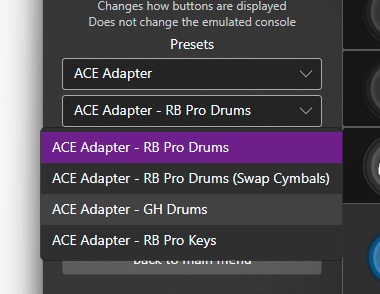
The ACE Adapter will require specific presets for specific games.
Rock Band games will require the “RB Pro Drums“/”RB Pro Drums (Swap Cymbals)” or “RB Pro Keys” presets.
Guitar Hero games will require the “GH Drums” preset.
Click here for a step-by-step programming guide.
To change the preset of your ACE Adapter, you must use the RCM Programming Tool. Click here to be taken to the download page.
- Open the RCM Programming Tool.
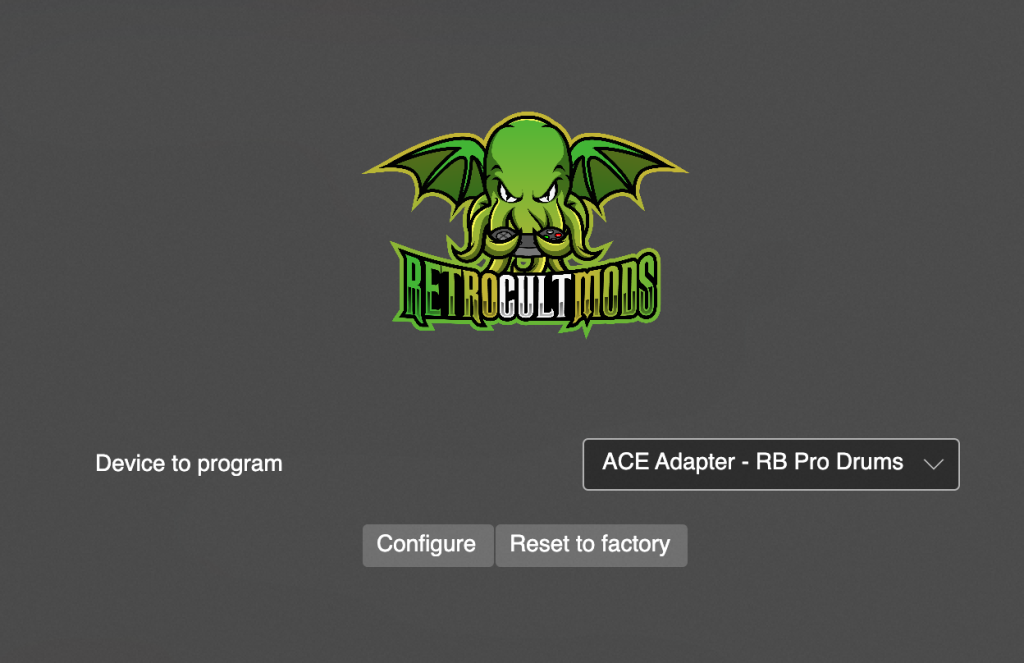
- Plug your ACE Adapter into your computer. You will see it appear with “Configure” and “Reset to factory” buttons.
- Click “Configure“
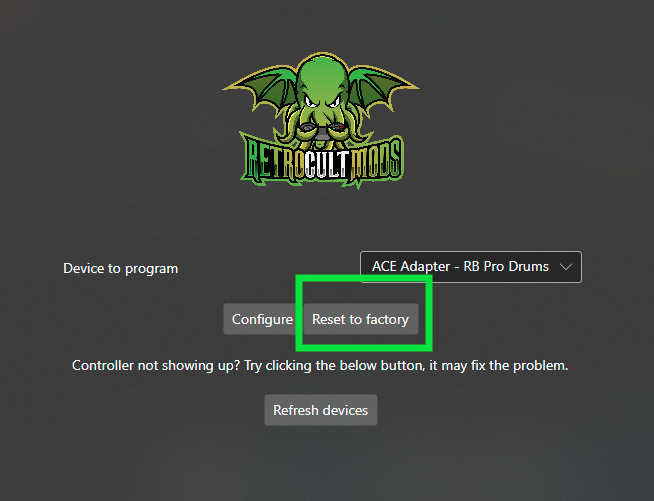
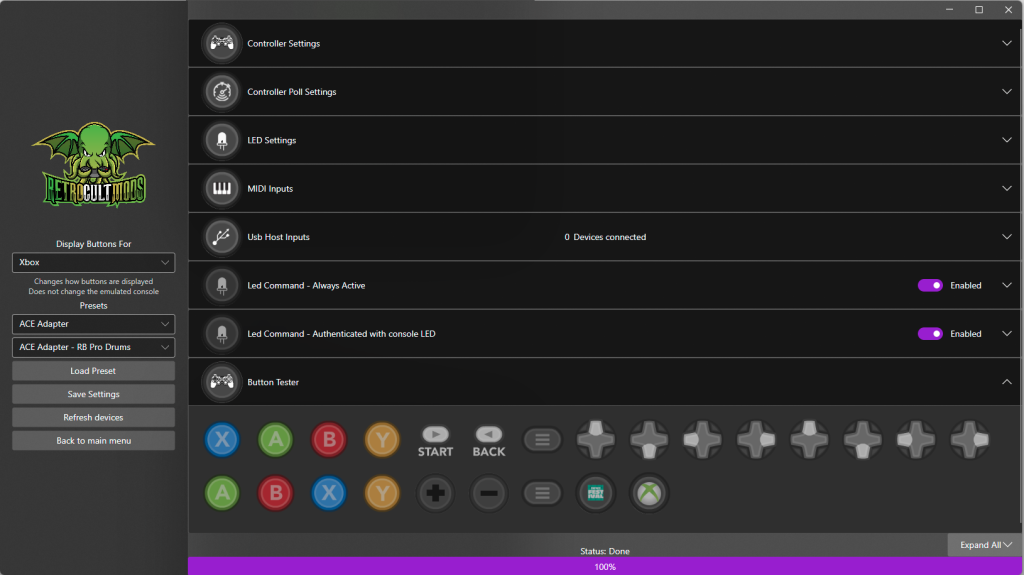
- You will be brought to this screen in the Programming Tool. (First image below)
If you are attempting to change to GH Drums, click the dropdown on the left side, then select that preset. After, click “Save Settings“. You will do the same process to revert back to Rock Band drums.
- You will want to wait until the bar at the bottom reaches 100% and says Status: Done.

Final notes:
You may need to adjust the hit sensitivity of your drums and cymbals, which can be done under the MIDI Inputs tab. This process is a little bit more advanced, but the effort of setting up what works best for you is worth it. This will be elaborated upon in the next section.
Instrument Setup and Tuning
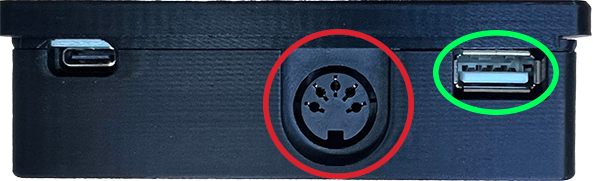
To use the ACE Adapter with your input device, you must connect the device to the adapter using either USB-MIDI or standard MIDI. Some devices may use only one or the other.
- Red circled input is standard MIDI
- Green circled input is for USB-MIDI
Drum Tuning
You definitely will want to tune everything and change the minimum input registers so you don’t accidentally overhit.
Click here for a step-by-step Drum Tuning guide.
- Before even attempting to play a game, make sure you’re on the preset for your intended game. Click here to be taken to the programming section. You can find out what preset you’re on in the main menu of the programming tool.
- Click Configure.
- Plug in your controller or electronic drum kit.
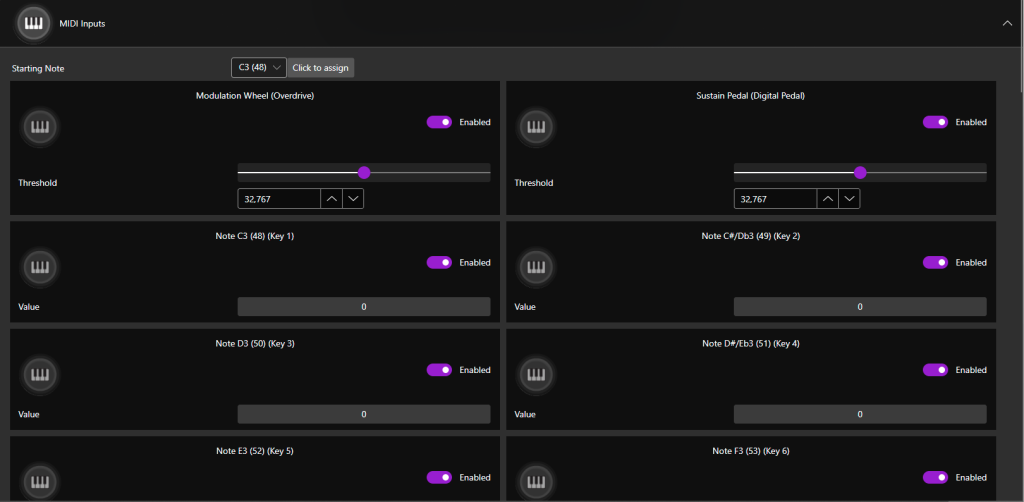
- If you are using USB-MIDI, you should see “1 Devices connected” next to USB Host Inputs.
- Click the MIDI Inputs dropdown, then start tapping on your drums while looking through the inputs to find if they are appearing. It may be useful to write down the MIDI note value for each of your pads/cymbals for easy future reference.
- Refer to the following picture. Value shows the signal sent from your drums to the ACE Adapter. Hit the pads to see the bar move and number go up! There are two modifiers you can change, Threshold and Sensitivity.
- Threshold is how hard you have to hit before the game detects an input. Raising this requires you to hit harder. You want to change this if your light hit starts at a high number.
- Sensitivity defines the max range of detection. It determines the loudness or hardness of the hit that the game detects. Lowering this allows hits with less strength to hit louder. You want to change this if your hard hits do not get close to maxing out the Value meter.
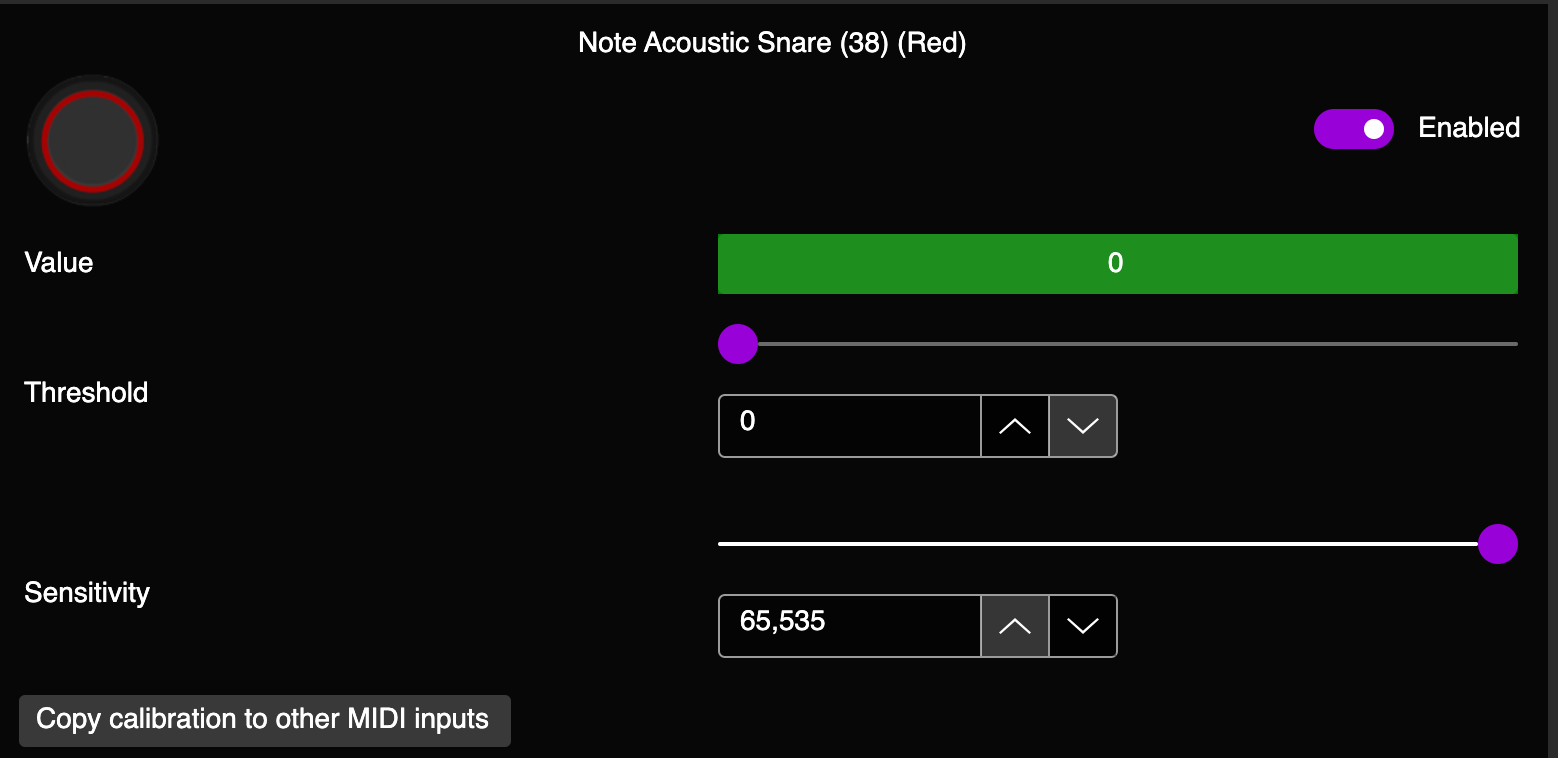
- Some pads are more sensitive than others, so we suggest going through each pad/cymbal/input and adjusting to your liking.
- Once you’re satisfied with calibration, click “Save Settings” on the left side of the window. Once the programming tool has finished writing the firmware, it will show “Status: Done” and 100%. Close the software.
- Load up your favorite game and play! Or plug into your console and play!
Pro Keys Tuning
Once you have the preset chosen and the keyboard plugged in, it’s plug and play.
Click here for a step-by-step Pro Keys setup guide.
- Before even attempting to play a game, make sure you’re on the preset for your intended game. Click here to be taken to the programming section. You can find out what preset you’re on in the main menu of the programming tool.

- Click Configure.
- Plug in your keyboard.
- NOTE: If you are using standard MIDI connection, make sure that the keyboard you’re using it plugged in either by a battery, USB power connection, or wall power. It will not function without that.
- If you are using USB-MIDI, you should see “1 Devices connected” next to USB Host Inputs when you plug it in.
- Click the MIDI Inputs dropdown, then start pressing keys down and look around the inputs to see if inputs are coming through.
- Once you’ve verified that inputs are going through, there is nothing to calibrate in the programming tool. You can now plug into a console and start playing!
- Do note that if you are using the Rock Band 3 keytar with standard MIDI as opposed to USB-MIDI, you will have to navigate the menus with the ACE Adapter buttons as opposed to the ones on the controller.
Troubleshooting
My ACE Adapter is not appearing in the RCM Programming Tool
There are various reasons for this occurring.
Make sure that your adapter is in “D” mode when plugging it in. If it is in “K” mode, the programmer will not see it. Move the switch on the device back to “D”.
Sometimes just unplugging it and plugging it back in will help or restarting the programming tool.
Lastly, you may need to hard reset the device. Holding the reset button (small little button on the bottom right of the face) while plugging the adapter in will put it into recovery mode, which you can then open the RCM Programming Tool and erase and reset to factory.
If this doesn’t work, send us an email at support@retrocultmods.com
My drum kit cymbals are swapped
You need to swap the preset to “RB Drums (Swap Cymbals)” in the RCM Programming Tool!