DIY Solder Kit
The RetroCultMods DIY Solder Kit contains everything you need to convert your official Red Octane Guitar Hero controller into a modded nearly universal guitar controller.
This kit REQUIRES both soldering equipment and knowledge to install!
Mod at your own risk.
If you do not know how to solder, the Revival Kit is a much better option!
Important Notes - PLEASE READ
- If using the Standard Fretboard, Xplorer models other than 95065 require 3D printed frets.
- If using the Standard Fretboard with Wii guitars, 3D printed frets are required.
- Soldering equipment and experience are NOT included.
- Colors may vary for 6 pin wire, washers, and/or screws; functionality not affected.
- Third party guitars have not been officially tested. Mod at your own risk.
Parts Included in Kit
- 1x RetroCultMods Zeroboard
- 5x Kailh Low Profile Choc Red Linear (silent) switches
- 2x Kailh Box Navy switch
- 2x SW-520D Tilt Sensor
- 1x 12 inch 6 pin wire (2x for RGB Fretboard kit)
- 1x 3D printed AIO kit
- 1x RetroCultMods Universal Fretboard or RGB Fretboard
- 5x 3D Printed translucent frets (RGB Fretboard kit only)
- 1x 12 inch 3 pin wire (RGB Fretboard kit only)
- 5x 90 degree pin headers (Standard Fretboard kit only)
- 6x Screws
- 1x 10ft USB Cable
Optional, but Recommended Parts
- All
- Authentication Cable - Required for Rock Band 4 on Xbox One/Series
- (SG and MayFlash users, email us for special TwinTail Cable)
- Authentication Cable - Required for Rock Band 4 on Xbox One/Series
- Xplorer
- Xplorer D-Pad/Start/Select Board (HIGHLY RECOMMENDED)
- USB-C Port
- Les Paul
- Start/Select Board
- D-Pad Board (Xbox/Playstation only)
- USB-C Port
- World Tour/GH5
- SG
- Kramer
- MayFlash
Kit Information
Supported Controllers


Supported Platforms and Games
- PC
- Playstation 2
- Playstation 3
- Playstation 4/5
- Xbox 360
- Xbox One/Series
- Wii
- Switch
- Clone Hero
- YARG
- Fortnite Festival
- Guitar Hero 3/BetterGH3
- Guitar Hero World Tour Definitive Edition
- Gitadora
- Emulators
- RPCS3
- PCSX2
- Dolphin
- Xenia (not tested)
The RB Guitar Preset must be used.
- Guitar Hero World Tour
- Guitar Hero Metallica
- Guitar Hero Smash Hits
- Band Hero
- Guitar Hero 5
- Guitar Hero Van Halen
- DJ Hero
- Rock Band
- Rock Band 2 (and DX)
- Rock Band Track Packs (not tested)
- Guitar Hero III
- Guitar Hero Aerosmith
- Guitar Hero World Tour
- Gutiar Hero Metallica
- Guitar Hero Smash Hits
- Band Hero
- Guitar Hero 5
- Guitar Hero Warriors of Rock
- Rock Band
- Rock Band 2 (and DX)
- Rock Band 3 (and DX)
- Lego Rock Band
- The Beatles: Rock Band
- Green Day: Rock Band
- Rock Band Track Packs (not tested, unconsistent results)
- Fortnite Festival (keyboard mode)
- Rock Band 4
- Guitar Hero II
- Guitar Hero III
- Guitar Hero Aerosmith
- Guitar Hero World Tour
- Guitar Hero Metallica
- Guitar Hero Smash Hits
- Band Hero
- Guitar Hero 5
- Guitar Hero Warriors of Rock
- Rock Band
- Rock Band 2 (and DX)
- Rock Band 3 (and DX)
- Lego Rock Band
- The Beatles: Rock Band
- Green Day: Rock Band
- Rock Band Track Packs (not tested)
- Fortnite Festival (keyboard mode)
- Rock Band 4 (authentication required)
The RB Guitar preset must be used.
- Rock Band 2
- Rock Band 3
- Lego Rock Band
- The Beatles: Rock Band
- Green Day: Rock Band
- Fortnite Festival (see Switch section)
Instructional Material
Required Tools
- Screwdriver with multiple bit sizes (PH1, PH2, T10, T6)
- Soldering Gear
- Soldering Iron
- There are many available, but we prefer to use these products:
PINECIL Portable Soldering Iron from Pine64
Silicone USB-C Power Cable
65W USB Power Block from Anker
- There are many available, but we prefer to use these products:
- Solder
- We prefer Kester 44 solder. Usually they sell it in 1LB rolls, but you can get by with one of the 1oz tubes if you don't plan on soldering often in the future.
- No-Clean Flux Paste (optional)
- Brass Wool
- Tape (optional, for holding strum switches in place)
- Solder Wick (see flux link)
- Solder Fume Extractor (optional, recommended)
- Soldering Work Mat (optional, recommended)
- Soldering Iron
- Flush Cutters (aka Diagonal Cutters)
- Wire Strippers
- 26AWG Stranded Wire
Soldering Tips
INFO YOU NEED TO KNOW:
Don't know how to solder? Check out iFixIt's soldering guide here!
Temperature
Soldering Iron temperature:
600°F or 315°C (Leaded Solder)
675°F or 360°C (Lead Free Solder).
Cold Joints can appear as a bubble or a more matte finish on your solder joint. If this happens, hold the iron and melt the solder again, but hold your iron there briefly so the heat transfers to the pins properly. If you've applied too much solder, use your solder wick.
To use solder wick, place the end of the wick over the solder you want to remove and then place your heated solder tip over it. The braid heats up and will suck up the solder. You can tell when the wick begins to pull the solder, as the wick will change color.
It can be tricky, so check out this video from How Do You? DIY:
Tinning Your Tip
Tinning Your Iron's Tip is a good habit when beginning a solder job. What you do is:
- Turn on your iron and set your it to the proper soldering temperature if it isn't already set, allow it to reach that temperature.
- Put a little bit of solder on the tip of your iron, just enough to coat the part you solder with.
- Clean the solder off of it using a damp sponge or brass wool. You will see that the tip is shiny. That means it's tinned!
Disassembly
Click here to expand the Disassembly section
Xplorer
Flip the controller over so the Red Octane sticker on the back of the body is visible. The type of screws used on the outside shells will depend on the model of your guitar:
95055/95605 – PH1/PH2 Screws
95157.805 – T10 Screws

The screw marked in red is sometimes longer than the others; remember this for when you put everything back together!
Rear body shell – 11x screws

Rear neck shell – 5x screws
Ensure that all screws are removed, and open the shell.
Once the shell begins to open, slowly move down the rest of the shell until it pops open completely. Repeat this process for the neck, using the opening at the neck connector and working towards the headstock.
If the shell seems to get stuck, DO NOT FORCE IT. Check to make sure you have removed all of the screws before continuing to pry the shell.
SG
Flip the controller over so the Red Octane sticker on the back of the body is visible.
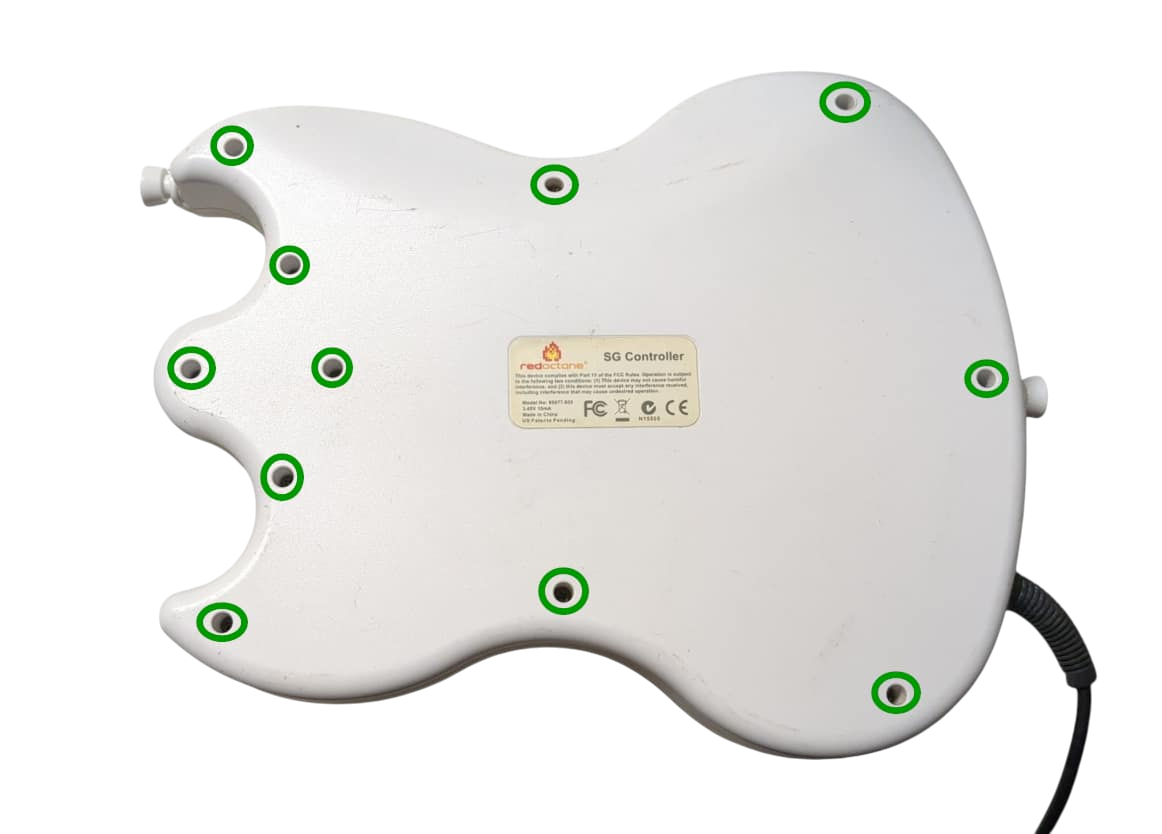
Rear body shell –11x screws
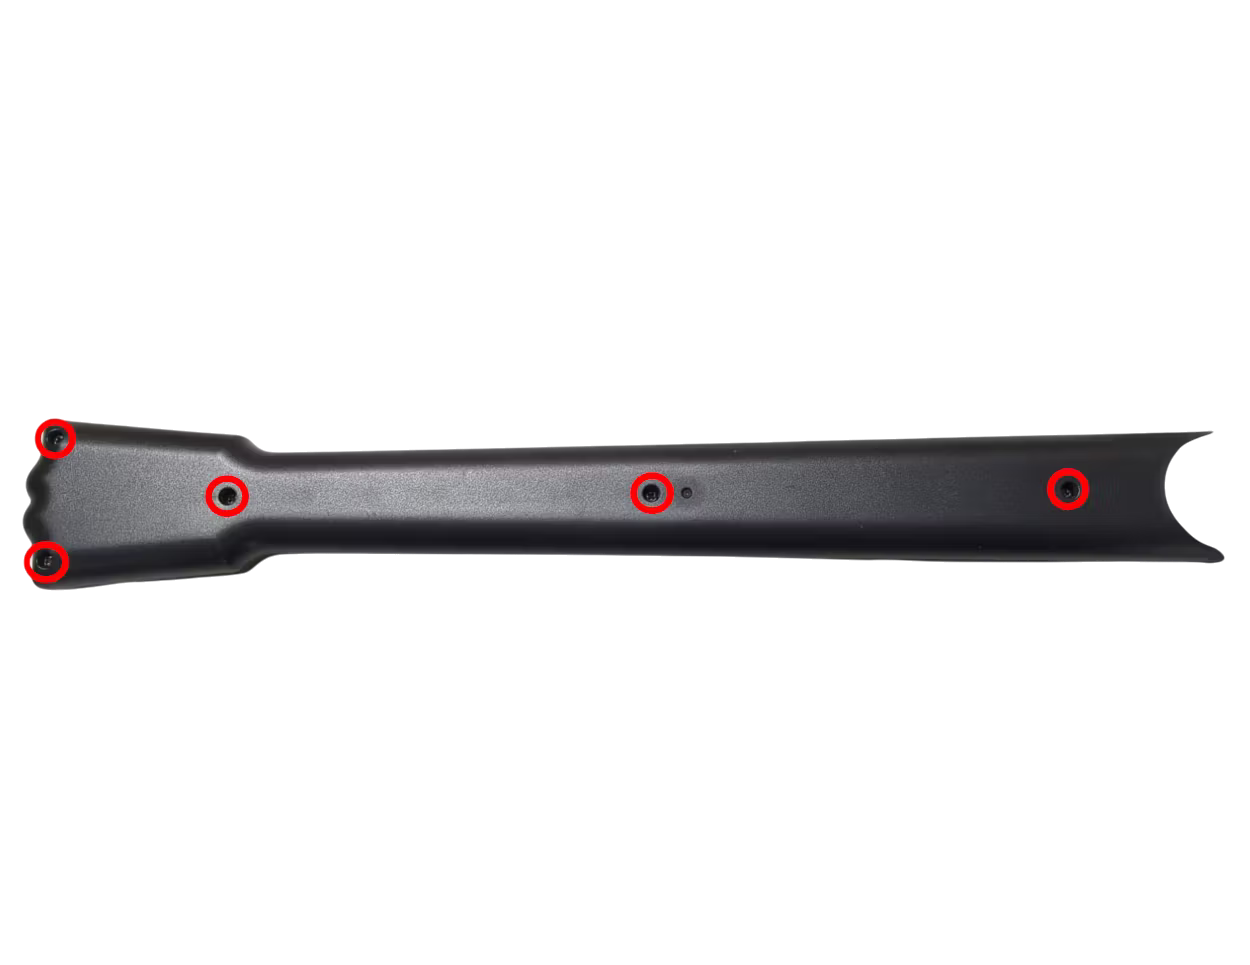
Rear neck shell – 5x screws
Ensure that all screws are removed, and open the shell.
Once the shell begins to open, slowly move down the rest of the shell until it pops open completely.
Repeat this process for the neck, using the opening at the neck connector and working towards the headstock.
If the shell seems to get stuck, DO NOT FORCE IT. Check to make sure you have removed all of the screws before continuing to pry the shell.
Kramer
Flip the controller over so the Red Octane sticker on the back of the body is visible. The type of screws used on the outside shells will depend on the model of your guitar:
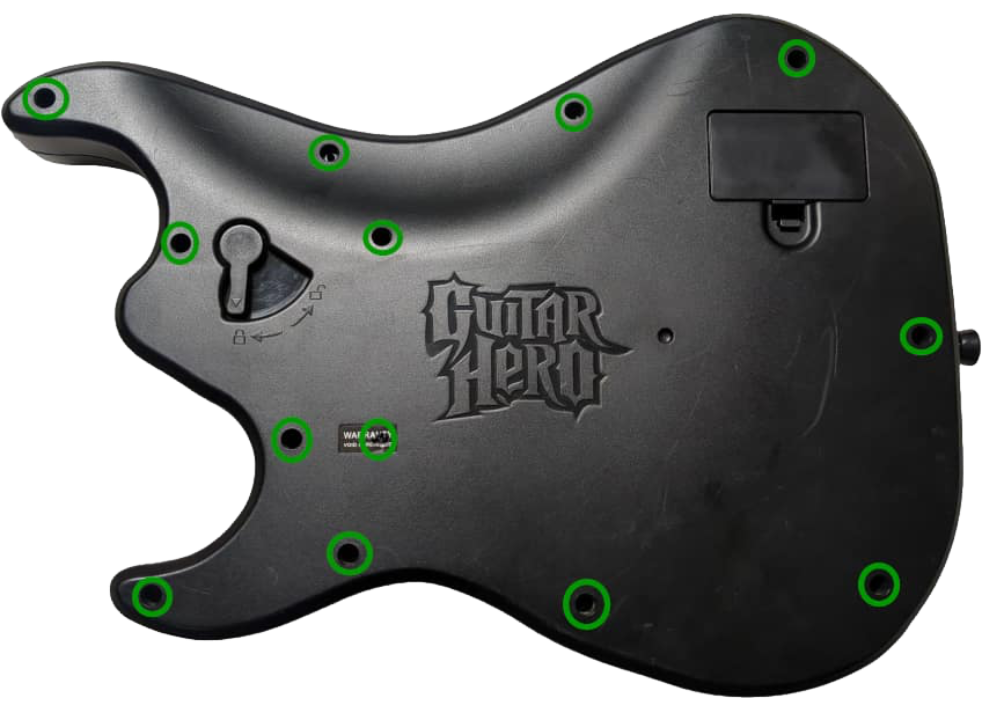
Rear body shell – 13x screws
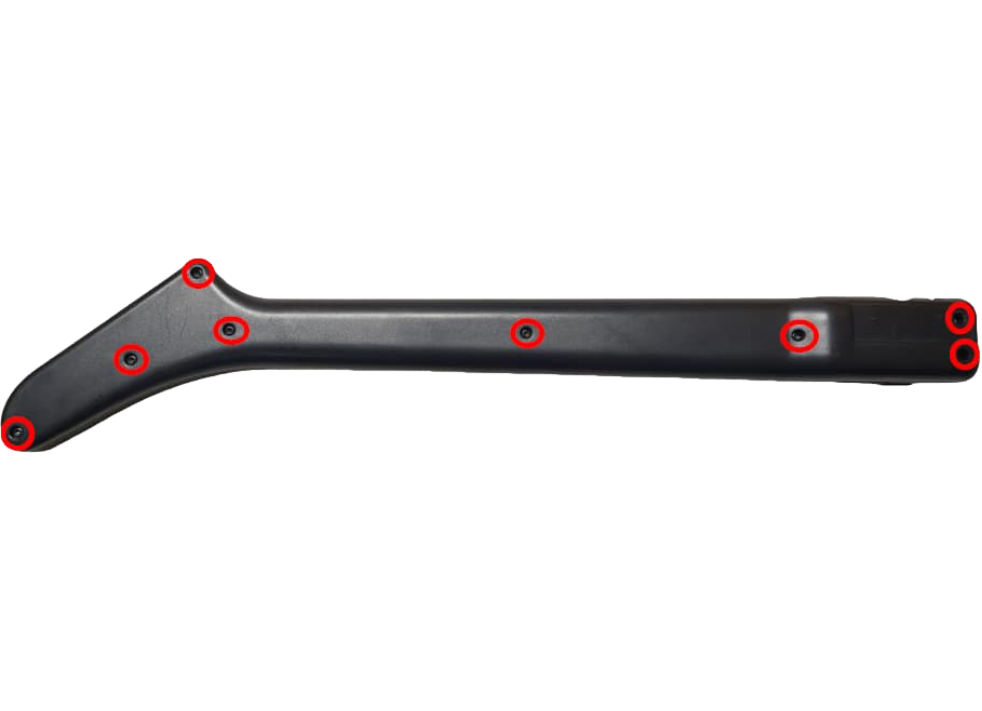
Rear neck shell - 8x screws
Ensure that all screws are removed, and open the shell.
Once the shell begins to open, slowly move down the rest of the shell until it pops open completely.
Repeat this process for the neck, using the opening at the neck connector and working towards the headstock.
If the shell seems to get stuck, DO NOT FORCE IT. Check to make sure you have removed all of the screws before continuing to pry the shell.
MayFlash
Flip the controller over so the Red Octane sticker on the back of the body is visible.
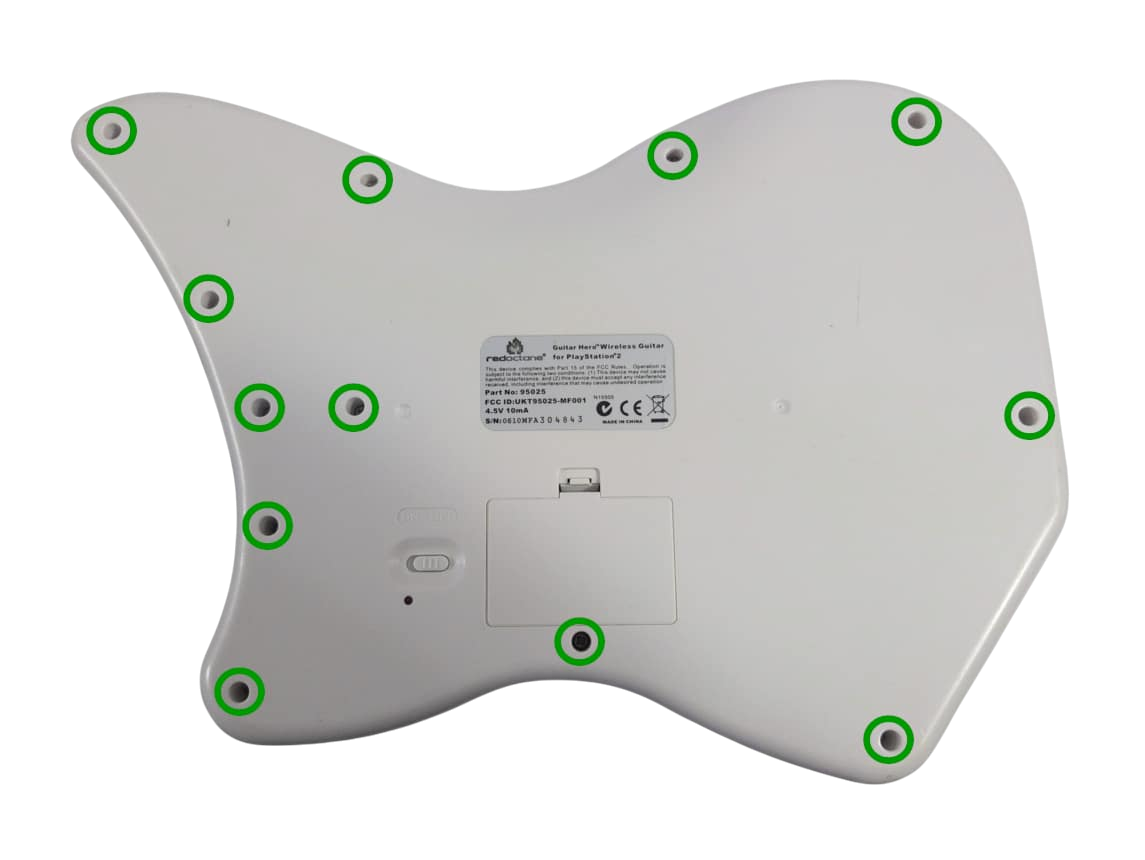
Rear body shell –12x screws
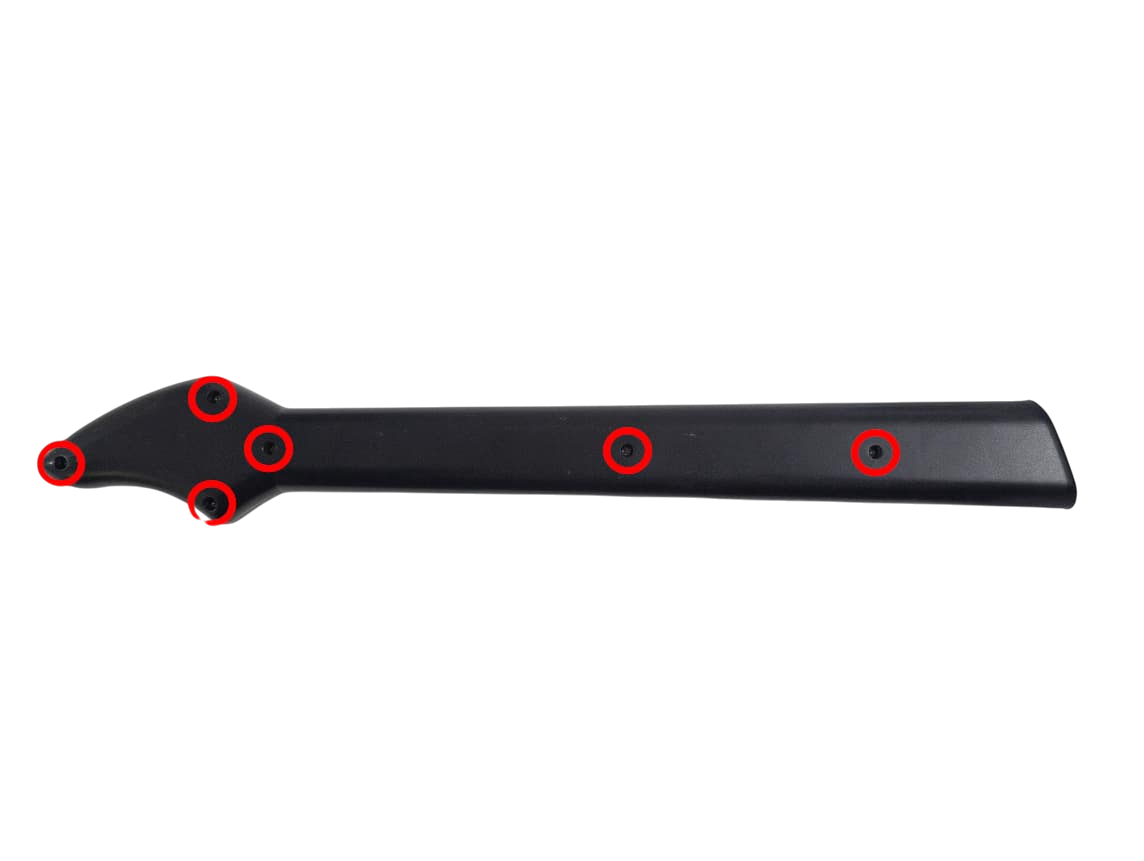
Rear neck shell – 6x screws
Ensure that all screws are removed, and open the shell.
Once the shell begins to open, slowly move down the rest of the shell until it pops open completely.
Repeat this process for the neck, using the opening at the neck connector and working towards the headstock.
If the shell seems to get stuck, DO NOT FORCE IT. Check to make sure you have removed all of the screws before continuing to pry the shell.
Xbox/PlayStation Les Paul
Flip the controller over so the Red Octane sticker on the back of the body is visible. The type of screws used on the outside shells will depend on the model of your guitar:

Rear body shell – 11x T10 screws

Front body shell (near neck) - 4x PH1 screws

Rear neck shell – 9x T10 screws
Ensure that all screws are removed, and open the shell.
Once the shell begins to open, slowly move down the rest of the shell until it pops open completely.
Repeat this process for the neck, using the opening at the neck connector and working towards the headstock.
If the shell seems to get stuck, DO NOT FORCE IT. Check to make sure you have removed all of the screws before continuing to pry the shell.
Xbox/PlayStation World Tour & GH5
Flip the controller over so the Red Octane sticker on the back of the body is visible.
Flip the controller over so the Red Octane sticker on the back of the body is visible. Move the faceplate latch to the unlocked position on the back of the guitar body, then remove the faceplate by pulling upwards from the neck slot.

 Body Screws
Front Body Shell - 11x T10 Screws
Front Body Shell (Neck) - 4x PH0 Screws
 Neck Screws
Rear neck shell – 11x T10 screws
Ensure that all screws are removed, and open the shell. Once the shell begins to open, slowly move down the rest of the shell until it pops open completely. Repeat this process for the neck, using the opening at the neck connector and working towards the headstock. If the shell seems to get stuck, DO NOT FORCE IT. Check to make sure you have removed all of the screws before continuing to pry the shell.
Wii Les Paul
Flip the controller over so the Red Octane sticker on the back of the body is visible. The type of screws used on the outside shells will depend on the model of your guitar:

Rear body shell – 11x T10 screws

Rear neck shell – 5x T10 screws
Front neck screws under faceplate - 4x PH1 screws
Ensure that all screws are removed, and open the shell.
Once the shell begins to open, slowly move down the rest of the shell until it pops open completely.
Repeat this process for the neck, using the opening at the neck connector and working towards the headstock.
If the shell seems to get stuck, DO NOT FORCE IT. Check to make sure you have removed all of the screws before continuing to pry the shell.
Wii World Tour & GH5
Flip the controller over so the Red Octane sticker on the back of the body is visible. Move the faceplate latch to the unlocked position on the back of the guitar body, then remove the faceplate by pulling upwards from the neck slot.

 Body Screws
Front Body Shell - 11x T10 Screws
Front Body Shell (Neck) - 4x PH0 Screws
 Neck Screws
Rear neck shell – 11x T10 screws
Ensure that all screws are removed, and open the shell. Once the shell begins to open, slowly move down the rest of the shell until it pops open completely. Repeat this process for the neck, using the opening at the neck connector and working towards the headstock. If the shell seems to get stuck, DO NOT FORCE IT. Check to make sure you have removed all of the screws before continuing to pry the shell.
Build
Click here to expand the Build section
Tools used:
- Soldering Gear
- Flush Cutters
Components:
- Universal Fretboard
- Kailh Choc Low Profile Red switches
- 90-degree Pin Headers
Insert the Kailh Choc Low Profile Red Switches into the fretboard, making sure that you put it in the correct way like shown below


Bend the thinner leg closest to the square solder pad down so it has contact or is very close to the solder pad.


Solder the leg to the pad. Repeat this for all 5 switches.

Once you've soldered all 5 legs, insert the 90-degree Pin Headers into the circular solder pads like shown below and orient them in a way where the headers touch the other leg of the switch like shown below.


Add a dab of flux to the spot where the two pieces of metal touch to hold the 90-degree Pin Header in place.
This part is tricky.
You must solder the 90 degree header to the leg of the switch. Apply heat to the area you added flux to, then apply solder. You want to make sure they are bound together with solder like shown below.

Once you've verified that all five headers have been soldered to their respective switch legs, flip the entire fretboard over. You must now solder the 90-degree Pin Headers to the fretboard. The circular pads around the headers are what must be soldered to, shown below.

Apply a small amount of flux, then carefully solder the pin header to the fretboard, being mindful to not touch the switch with soldering iron.
Put the entire fretboard assembly into one of the bubble bags included in the box. This will protect you from flying shrapnel. Using flush cutters, cut the excess metal of the header, leaving just the "mountain" shape of soldered metal, like shown below.

Flip the fretboard over and snip the two plastic legs of the switches off of all five switches.


The fretboard should look like this when complete:


Tools used:
- Soldering Gear
Components:
- RGB Fretboard
- 5x Kailh Choc Low Profile Red Switches
Insert the Kailh Choc Low Profile Red Switches into the fretboard, they will only go one way. Start with the two on the far ends.
Flip the board over and push the PCB down to ensure that the switches are flush against it. Doing this on a hard surface will help.
Solder the switch pins to the fretboard. Repeat the process until you've soldered all five switches to the fretboard.

Tools used:
- Soldering Gear
- Tape
Components:
- Zeroboard/Strumboard
- 2x Kailh Box Navy strum switches
Place your Zeroboard down on the table, component side facing down.
Insert the two strum switches included in the kit into the designated holes in the middle of the board. They will both only go in one way, with the two metal pins going into metal sockets.

Optional! Tape the switches down to the board, making sure that the switches are flush to the board or as flush as they can be.
Flip the Zeroboard over and solder the four strum switch legs.
Tools used:
- Wire Strippers
- Flush Cutters
- Soldering Gear
Components:
- Assembled Fretboard
- Assembled Zeroboard/Strumboard
- 6-pin 12 inch wire
- 3-pin 12 inch wire (RGB Fret Kit only)
Strip both ends of one set of wires by approximately 1cm. More is okay, you'll just have to trim it after
Separate the ends of the wires by about an inch and a half.
Observe both the Zeroboard and Fretboard pins, you will see the following pins:

Make a mental gameplan of how you'll approach the soldering. You can either solder all on one side at a time, or back and forth per wire.
Twist the ends of the wires so that there's no loose strands of copper, then insert them one by one into each fret color socket and ground sockets.
Apply flux to each pad, then begin soldering each wire/pad, making sure that the solder joints are not bridging.
MAKE SURE YOU ARE MATCHING BOTH ENDS OF THE WIRE TO THEIR RESPECTIVE SOCKETS. GREEN TO GREEN, RED TO RED, ETC.
Examples of clean solder joints and bridging are shown below.
Flip both boards over then use your flush cutters to snip off any loose wires.
Once you've verified that all five frets and ground have been soldered, plug the Zeroboard into your computer and test each input. Take this time to test the strum inputs as well.
THE NEXT STEPS ONLY APPLY IF YOU ARE INSTALLING THE RGB FRET KIT
THE NEXT STEPS ONLY APPLY IF YOU ARE INSTALLING THE RGB FRET KIT
THE NEXT STEPS ONLY APPLY IF YOU ARE INSTALLING THE RGB FRET KIT
THE NEXT STEPS ONLY APPLY IF YOU ARE INSTALLING THE RGB FRET KIT
THE NEXT STEPS ONLY APPLY IF YOU ARE INSTALLING THE RGB FRET KITNow that you've soldered the fret inputs, it's time to solder the RGB. Carefully observe both the fretboard and Zeroboard. You will see MOSI, SCK, and VBUS. VBUS is scrunched up close to a GND input, but we've labeled it in this picture below.


Split the remaining 6-pin 12 inch wire in half so it becomes two 3-pin wires. Then strip the ends like before. Twist the copper wires so there's no loose strands.
Carefully insert them into the MOSI, SCK, and VBUS sockets, being careful that no loose strands touch another socket.
Begin soldering each wire/pad. Make sure that none of the solder joins are bridging.
Flip both boards over then use your flush cutters to snip off any loose wires.
Plug the Zeroboard into your computer and test the RGB LEDs.
Tools used:
- Flush Cutters
- Wire Strippers
- Soldering Gear
Components:
- Original Whammy Potentiometer
- Zeroboard
Snip the wires connected to the whammy potentiometer, on the far end so that you have a lot of wire to work with, shown below.

Strip the end of the three wires. If they aren't already separated, separate them to make it easier to solder.
Find the VCC, ADC, and GND solder pads on the corner of the Zeroboard

The middle wire connected to the whammy potentiometer MUST go into the "ADC" socket. The other wires can go on either side, but it's easier to solder in the order the wires are already in.
Solder the whammy wires to their respective pads.
Flip the Zeroboard over and use the flush cutters to trim the excess wire.
Open the RCM Programming Tool and test that the whammy values are going up and down as you turn the potentiometer.
Tools used:
- Soldering Gear
- Flush Cutters
- Wire Strippers
- 26AWG Wire (if using replacement board)
Components:
- Original Start/Select Board or Replacement
- Zeroboard
If you are using the replacement strumboard, skip to step 3.
Snip the wires connected to the start/select board, on the far end closer to the existing control board, so that you have a lot of wire to work with.
Strip the ends of the wires, splitting them if needed, then twist the ends of the wires to prevent frayed wires from touching other solder pads.
Observe the Start/Select board on the side with the golden contact pads. Follow each trace and determine which input is which if they are not labeled. There will be START, SELECT, and GROUND.
Observe the START, SELECT, and GROUND solder pads on the Zeroboard, shown below.

Insert the respective wires into their designated solder pads, then solder.
Open the RCM Programming Tool and test the start/select inputs.
Only the Xbox 360 and PS3 variants of the Les Paul, World Tour, and GH5 models have D-Pads. We do not provide soldering instruction for the stock d-pads of those guitars.
Replacements D-Pad Boards can be purchased here.
Tools used:
- Soldering Gear
- Flush Cutters
- Wire Strippers
- 26AWG Wire
Components:
- Replacement D-Pad Board
- Zeroboard
We do not provide support for the following stock D-Pad boards:
- Xbox 360 Les Paul
- PS3 Les Paul
- Xbox World Tour/Sunburst
- PS2 World Tour/Sunburst
- PS3 World Tour/Sunburst
- Xbox GH5
- PS2 GH5
- PS3 GH5
- Xbox 360 Xplorer
Solder the matching pads on the replacement D-pad boards to these pads on the Zeroboard:

Observe these four pads on the Zeroboard

Bend the Authentication Cable's pins 90 degrees, so that you can access the pads to solder the pins to the Zeroboard.
Solder the pins to the sockets.
To test the authentication cable:
- Open the RCM Programming Tool
- Plug the Zeroboard into your computer
- On the configuration screen, observe the USB Host dropdown menu.
- Plug a gamepad into the authentication cable
- A device should appear on the USB Host dropdown menu.
Tools used:
- Screwdriver Kit
- Soldering Gear
- 26AWG Wire
Components:
- USB-C Daughterboard
- Zeroboard
Observe these pads on the Zeroboard:

Observe the solder pads on the USB-C daughterboard, they match the pads on the Zeroboard.

Prepare four wires with stripped ends, in different colors.
You will need to solder each wire one by one, making sure to be careful as to not touch anything but the wire, pad, and solder during the soldering process.
Repeat this for all four wires.
IMPORTANT
Do a thorough check of each solder joint to make sure nothing is bridging.Connect your Zeroboard to your computer using the newly installed USB-C port. It should work in the same way as the USB-C port on the strumboard.
Setup
Programming
- Zeroboard
- USB-C to USB-A cable
- A computer that uses Windows, macOS, or Linux
- The latest revision of the RCM Programming Tool
Notes
- PS2 and Wii require RB Guitar preset.
- GH Guitar
- Your default preset. You don't really ever need to leave this preset unless you're having issues or are playing on PS2/Wii.
- RB Guitar
- Necessary for PS2 and Wii gameplay. It also can be used for RB Guitar passthru on RPCS3, but that's a more advanced thing.
- GH Guitar (Debug)
- If you find that your guitar is automatically going into keyboard mode (green/start) or Riffmaster Emulation mode (orange/select), use this preset to see which input is having issue in the RCM Programming Tool input tester.
Whammy Calibration
Open the RCM Programming Tool
Plug your guitar into your computer
Click the Configure button

Click the Whammy dropdown menu

Click Calibrate
Without touching the whammy bar, click Next. Then, push the whammy bar further in (like furthest activated) without pushing too hard to damage it. Hold it in that position, then click Next.
Now you're setting the Deadzone. The Deadzone is where the whammy begins activation. So you want to make it to where the whammy cannot actuate unless you intentionally press it inwards. Once you've set that, click Next.

You're done! If you find that the deadzone isn't quite right, you can adjust it via the slider or by recalibrating.
Xbox RB4 Authentication
Requires authentication cable, purchased a la carte.
To play Rock Band 4 on your Xbox with a guitar modded with a DIY Solder Kit, you will have to have an authentication cable connected to your Zeroboard.
If you have that installed, authenticate with a licensed Xbox One or Xbox Series controller.
Turn on the Xbox One/Series, then using your Xbox controller, load into Rock Band 4.
Disconnect the Xbox controller from your Xbox One/Series. (Pop out batteries)
Connect the licensed Xbox controller into the authentication cable.
- Xbox One – models 1537, 1697, and 1698
- Xbox One S – models 1708 and 1797
- Xbox Series S/X – model 1914

Plug your guitar into the Xbox with the gamepad plugged into it.
Wait a moment, then press start on the gamepad to verify the connection is made. On the "Join" screen, a guitar player should appear. If your controller is connected under the profile you want to use for the guitar, you’ll need to “drop out” the controller before assigning that profile to the guitar.

Unplug the licensed Xbox controller from your guitar.
Play the game!
Fortnite Festival
Open Fortnite on your platform of choice.
Load into the Festival Main Stage.
Open the settings menu, then move over to the Game tab.

Scroll down to the "Festival - Pro Parts" category.

Enable the "Always Display Pro Parts" setting. Feel free to disable the "Show Button Labels (Pro Lead, Pro Bass)" setting since they will show keyboard inputs rather than the fret colors.

Plug your guitar into your console/pc while holding GREEN.
Your guitar should work immediately. You can test this by pressing START/OPTION on your controller twice or pressing ENTER on your keyboard. This will open the chat menu. Tap the frets. Numbers should appear. If they do not, repeat step 7.
Navigate the game with your controller or mouse/keyboard. Once you pick your songs, ready up, and load in, it should just work!
Open Fortnite on your Nintendo Switch.
Load into Festival Main Stage.
Open the Settings menu, then move over to the Game tab.
Scroll down to the "Festival - Pro Parts" category.
Enable "Enable Guitar Mode" and "Always Display Pro Parts."
Plug your guitar into your Nintendo Switch or Switch Dock.
Wait a few seconds, then test if the guitar is functioning by pressing the blue fret to open the music menu. You should be able to navigate the music menu using the strum bar and GREEN/RED frets.
Once you've selected your songs, leave the music menu then press and hold YELLOW fret.
It should just work!
Windows Games and Emulators
Setup on Windows is usually easy as plug-and-play, but sometimes things have to be mapped manually.
Open Clone Hero.
Press the SPACE BAR on your keyboard to open the controls/binds menu.

If you haven't already, plug in your guitar. It will appear here:

Click the Calibrate button.

You will be taken to this menu:

Axis 0 tends to pertain to whammy while Axis 1 is usually for tilt. Click Calibrate and follow the directions. Once you've calibrate, click Done.
On the right side of the main binds menu, there are blank spaces for each input. Click on the inputs that apply to your instrument and follow the setup instructions. Once you've bound all applicable inputs, click Done at the top left of the screen.

Once binds are set, press start in the home screen to pick your profile, then jump into a song and test out your inputs!
Plug your guitar into your computer
Open the YARC Launcher, then open YARG
Once the game is open, head to the Profiles section

Create a new profile if you don't already have one, then click "Connect" on that newly made profile. It will ask you to pick a device.


Guitar binds should automatically be set by YARG.
Inputs should be bound automatically when using the GH Guitar preset (default).
If not, refer to the Definitive Edition Binding Controllers guide.
Inputs should be bound automatically when using the GH Guitar preset (default).
If not, try plugging the guitar in BEFORE you open the game.
If that does not work, update your BetterGH3 to the latest revision.
Download this guitar preset file for an easy setup process:
Plug your guitar into your computer.
Open Dolphin.
Click Controllers in the menu bar.

Click the Configure button next to Emulated Wii Remote (Wii Remote 1).

A window will appear that shows a bunch of inputs. At the top right there is a box that says Profiles. Click the arrow on the right, then select Open Folder.

A Windows File Explorer window will appear. Drag and drop the 'RCM Guitar for Dolphin.ini' file into that folder. It will look like this:

Go back to Dolphin controller configuration menu, then in the Profiles box, click the dropdown and select RCM Guitar for Dolphin. You may need to close the configuration window and reopen it for this selection to appear.

Click Load. The following settings will change in the Extension menu and Motion Simulation menu. You can double check for these:


At the top left of the window, there is a box titled Device. If your device is not set to Xinput Guitar, switch it to that. You'll be able to see your inputs pop up with little red bars when you press them.

Once you've confirmed that your inputs are working, close the window. You're ready to play!
You can use our premade PCSX2 Preset File for an easy setup.
Open PCSX2 and click Tools > Click "Open Data Directory"

This will open a file explorer window of your PCSX2 Installation folder.
Drag the PCSX2 Controller Preset file into into the "inputprofiles" folder.

Once the preset file is in the 'inputprofiles' folder, close PCSX2 and reopen it. Navigate to Settings > Controllers. On the bottom left, click the dropdown menu next to "Editing Profile:" and change it to "RCM_PCSX2_Profile"

Click on "Controller Port 1 – Guitar" in the left menu. This screen will appear. If it does not look like this, double check to make sure that the Editing Profile is set to "RCM_PCSX2_Profile".

Close the window and test the inputs in a game!
If it does not work, make sure no other controllers are plugged into your computer.
You can use our premade RPCS3 Controller Preset file for an easy setup.
- You must first navigate to where RPCS3 is installed.
This can be done easily by right clicking an installed game, hover "Open Folder", then click "Open Custom Config Folder". This will open up a window that contains your game configurations.

Click the "config" folder.

Open the "input_configs" folder. If this folder doesn't exist, create it.

Open the "global" folder. If this folder doesn't exist, create it.

Lastly, drag the "RCM RPCS3.yml" file into the global folder.

You can now close out of the File Explorer window.
Returning to RPCS3, click on the "Pads" button at the top. This will open the controller configuration menu.

At the top right of the menu, click on the Configuration Files dropdown menu and switch it to "RCM RPCS3 Profile".

At the top middle of the menu, your device should have changed to "XInput Pad #1". If it shows "(disconnected)" beside it, unplug and plug the guitar back in. Then, click the dropdown and see if there is a device without the disconnected tag. If you don't see XInput Pads at all, change the handler in the top left to XInput. If you need further support with this part, let us know.

You can verify that everything is set correctly by comparing to this image.
- Your XInput Pad #1 is selected
- Your Configuration Preset is set to "RCM RPCS3 Profile"
- Triangle is set to X
- Square is set to Y
- Device Class is set to Guitar

Hit Save. This window will pop up. Hit Yes.

The popup happens because we have to map tilt to select, as RPCS3 does not have guitar hero controller passthru YET.
Boot your game and have fun!
Troubleshooting
There are multiple potential reasons for this occurring.
-
There may be bridging or a cold solder joint near the following buttons:
- GREEN FRET
- ORANGE FRET
- START Button
- SELECT BUTTON
-
Faulty USB cable or PC USB port. Using the same cable, try a different port, then switch the cable and try the same process.
-
Lastly, you may just need to hard reset the device. Hold the reset button (small gold button on the Zeroboard) while plugging the Zeroboard in will put it into recovery mode, which will make a drive named "RPI-RP2" appear on your computer.
Drop this file into that folder.
CLICK HERE TO DOWNLOAD FLASH NUKE FILE
After you drop the file in, open the RCM Programming Tool and attempt to reprogram.
If you continue to run into issues, send us an email at support@retrocultmods.com
The RCM Programming Tool will sometimes get blocked by Windows Defender or other antivirus software. This is a false positive. The pop-up tends to occur due to the tool being freshly made (we have to recompile the programmer every time we update revisions). Click Run Anyway.
If you are experiencing the following pop-up, macOS is detecting the RCM Programming Tool as a false-positive for being malware.

To fix this, open your System Settings/System Preferences.
Then navigate to the Privacy and Security tab in the left side menu.
Once you've entered this tab, scroll down to the Security section, then you'll see that the programming tool was blocked. Click Open Anyway. It will ask you to either enter your password or input Touch ID.

Once you've completed this, the programmer will open. However it is only for this revision.
Say you had 10.7.11 instead of 10.7.10, you would need to do this process again.
If the RCM Programming Tool is not seeing your device, it is likely due to a permissions issue in Linux. You will need the following file:
Navigate to /etc/udev/rules.d/, then drop 68-RCM.rules into the folder. Once you've done that, open the RCM Programming Tool. Your device should appear now! If not, try unplugging and plugging back in.
Add this to your Steam Launch Options:
WINEDLLOVERRIDES="xinput1_3=n,b" %command%