RCM V3 – PC Games
Game Setup
Now that you’ve installed your RetroCultMods V3 Adapter, we can setup games!
Please click on the game you’ll be playing in dropdown menu below:
Keyboard Mode
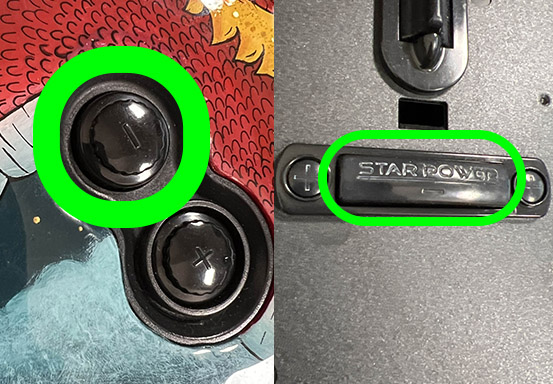
When plugging in your guitar, press and hold the GREEN button.
This will put your guitar into keyboard mode, where your inputs will be assigned to the default Fortnite Festival Pro Lead Keyboard settings:
- 1-5 for frets
- Right Ctrl & Right Shift for strum
- Forward Slash (/) for whammy
- Page Down for overdrive
Note that you will have to control your menus/character movement with keyboard & mouse/other controller, but once you load into the Festival game mode, the guitar will function as intended!
Have fun!

RB4 Guitar Mode
When plugging in your guitar, press and hold the SELECT/-(minus) button. (pictured) This will put your guitar into RB4 Guitar mode, mimicking how a legacy Rock Band 4 controller would work on console.
This will let you control the Fortnite menus, but you will still need to control your character’s movement with keyboard & mouse/other controller.
Have fun!
Plug and Play
Since you have already prepared your adapter in the installation guide, just plug the adapter into your computer!
- Open Clone Hero
- Press the Start button on your controller then choose a profile.
- Start playing!
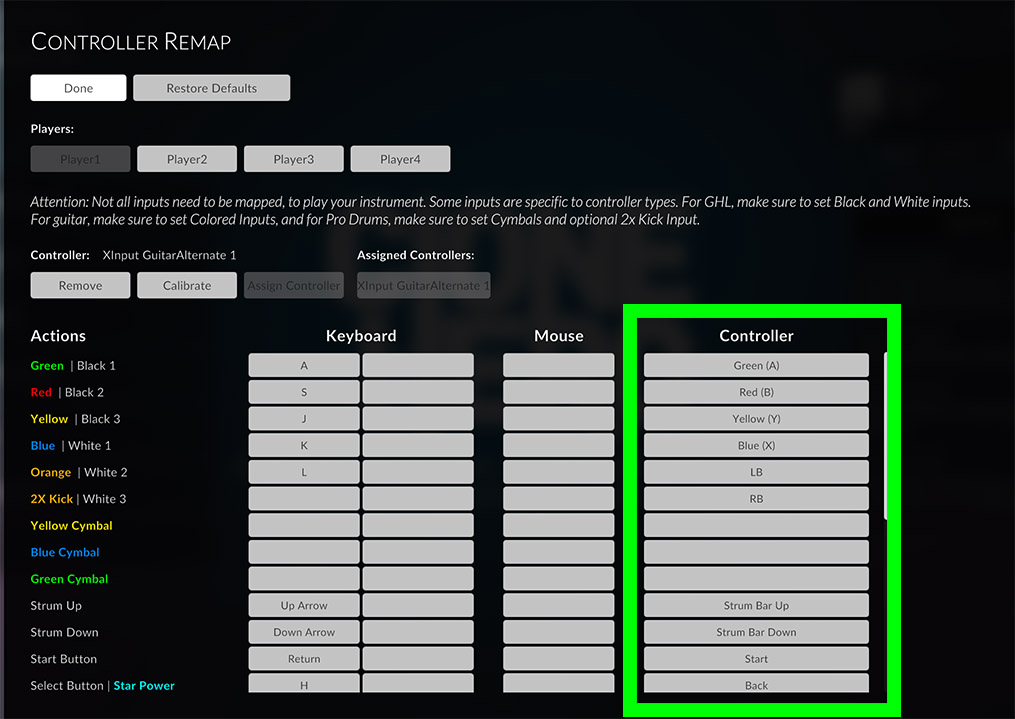
If you have any issues with an input not working, press SPACEBAR in the main menu and see if any of your individual button press binds are missing. If they are, click on that and rebind it with your guitar. (pictured)
YARG Profile Setup
Since you have already prepared your adapter in the installation guide, just plug the adapter into your computer! Now to setup your YARG profile:
- Open YARG, then click Profiles.
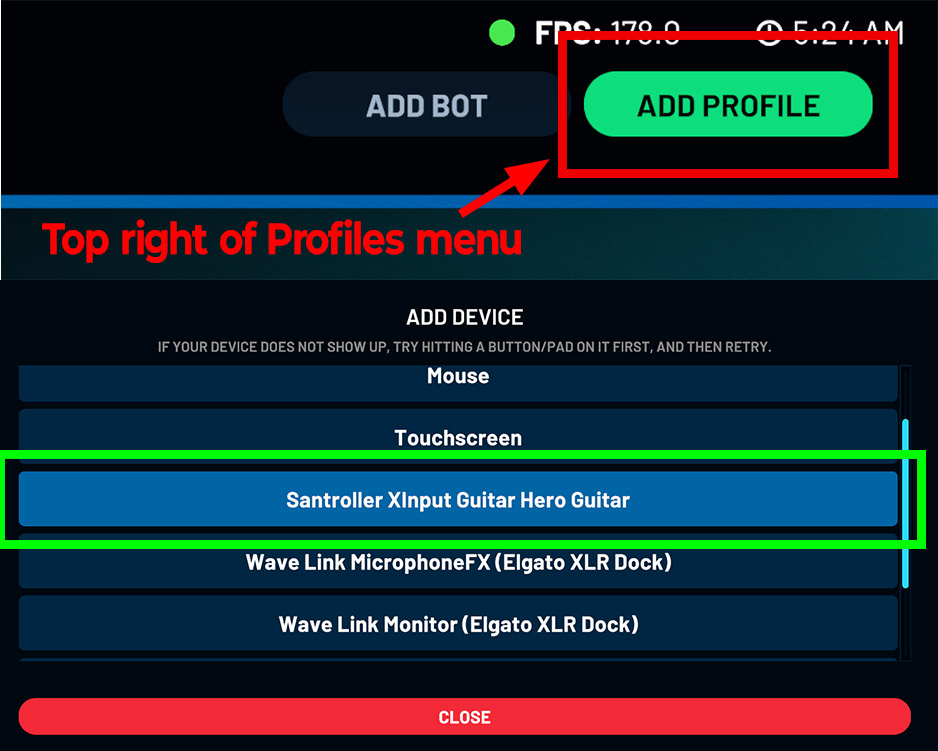
- Click Add Profile if no profile exists, otherwise click on the profile you want to add the controller to.
- Click Connect.
- Select Santroller XInput Guitar Hero Guitar from the list.
- Start playing!
If you are experiencing any issues with your inputs, you can check your individual button binds. See the second image below.

Plug and Play
Since you have already prepared your adapter in the installation guide, just plug the adapter into your computer!
Open GHWT:DE and it should work natively.
If not, refer to the Definitive Edition Binding Controllers guide.

The following are guides on how to setup a guitar with emulators:
Emulation Preset
Since you have already prepared your adapter in the installation guide, we must now set up the firmware and mapping for RPCS3!
Connect your official Wii Guitar to the Wii port on the other side of the adapter. Download the RPCS3 preset: Wii Adapter RPCS3 Preset- Open the RCM Programming Tool, click “Configure”. You will be taken to a menu that has presets on the left side of the window. Change the Preset to “RCM Wii Guitar Adapter – Emulator”. Click Load Preset.

- Copy the preset file into your RPCS3 installation folder under: “config\input_configs\global”

- Open the Pads menu

- Make sure the Device is st to XInput Pad #1 and select “RCM Wii Guitar Adapter” from the Configuration Files dropdown. Click Save.

- Boot the game you’d like to play.
- You may have to unplug the USB cable and plug it in again after the game has booted if you are not getting inputs right away.
- Start playing!
Manual Mapping
Guide coming soon.
Emulation Preset
Since we’ve already installed the guitar into the adapter, we must now set up the adapter firmware and mapping for Dolphin!
Connect your official Wii Guitar to the Wii port on the other side of the adapter. Download the Dolphin preset: Wii Adapter Dolphin Preset- Open the RCM Programming Tool, click “Configure”. You will be taken to a menu that has presets on the left side of the window. Change the Preset to “RCM Wii Guitar Adapter – Emulator”. Click Load Preset.
- Open Dolphin and click File > Open User Folder. Copy the Dolphin preset file into: “Config\Profiles\Wiimote”

- Open the Controllers menu, then click Configure under the Wii Remote controller you’d like to set up.

- Change your Device to XInput/Guitar, change the profile to the RCM preset, then click Load.

- Boot your game and start playing!
Manual Mapping
Emulation Preset
Since we’ve already installed the guitar into the adapter and have plugged it into your computer, we must now set up the adapter firmware and mapping for PCSX2!
Connect your official Wii Guitar to the Wii port on the other side of the adapter. Download the PCSX2 preset: - Open PCSX2 and click Tools > Click “Open Data Directory“. Drag the PCSX2 Controller Preset file into into the “inputprofiles” folder.


- Once the preset file is in the ‘inputprofiles’ folder, close PCSX2 and reopen it. Navigate to Settings > Controllers. On the bottom left, click the dropdown menu next to “Editing Profile:” and change it to “RCM_PCSX2_Profile“. Once this is set

IF YOUR GUITAR DOESN’T IMMEDIATELY WORK AFTER
- Click on “Controller Port 1 – Guitar” in the left menu.

- Boot your game and start playing!
Manual Mapping
Emulation Preset
Manual Mapping
Looking to setup other instruments for your games?
At this time we do not provide game setup guides for other instruments, so you will have to find support for them externally. However, this may provide them in the future! Stay tuned!